
10 Fatal Mistakes When Building a Chopper: Don’t Build a Trailer Queen
A chopper that only looks good on a trailer isn't a motorcycle; it's just a very expensive piece of heavy metal lawn art. You want a machine that screams "badass" at the stoplight but doesn't try to eject you into a ditch when you hit 60 mph. We've all seen those builds where the owner dropped $7,970 on a natural finish S&S Evolution motor only to realize their "killer" rake makes the bike handle like a shopping cart with a broken wheel. It's frustrating to waste money on components that don't fit or, worse, make your ride a literal death trap.
Stop guessing and start building. This guide is your shortcut to choosing the right parts for a chopper build so you can spend more time on the asphalt and less time swearing at a rolling chassis. We are stripping away the pretension and getting straight to the point. You'll learn exactly where to spend your budget for maximum performance and which "style" choices are actually mechanical suicide. We are breaking down the ten fatal mistakes that separate the pro-racer machines from the garage-bound nightmares.
Key Takeaways
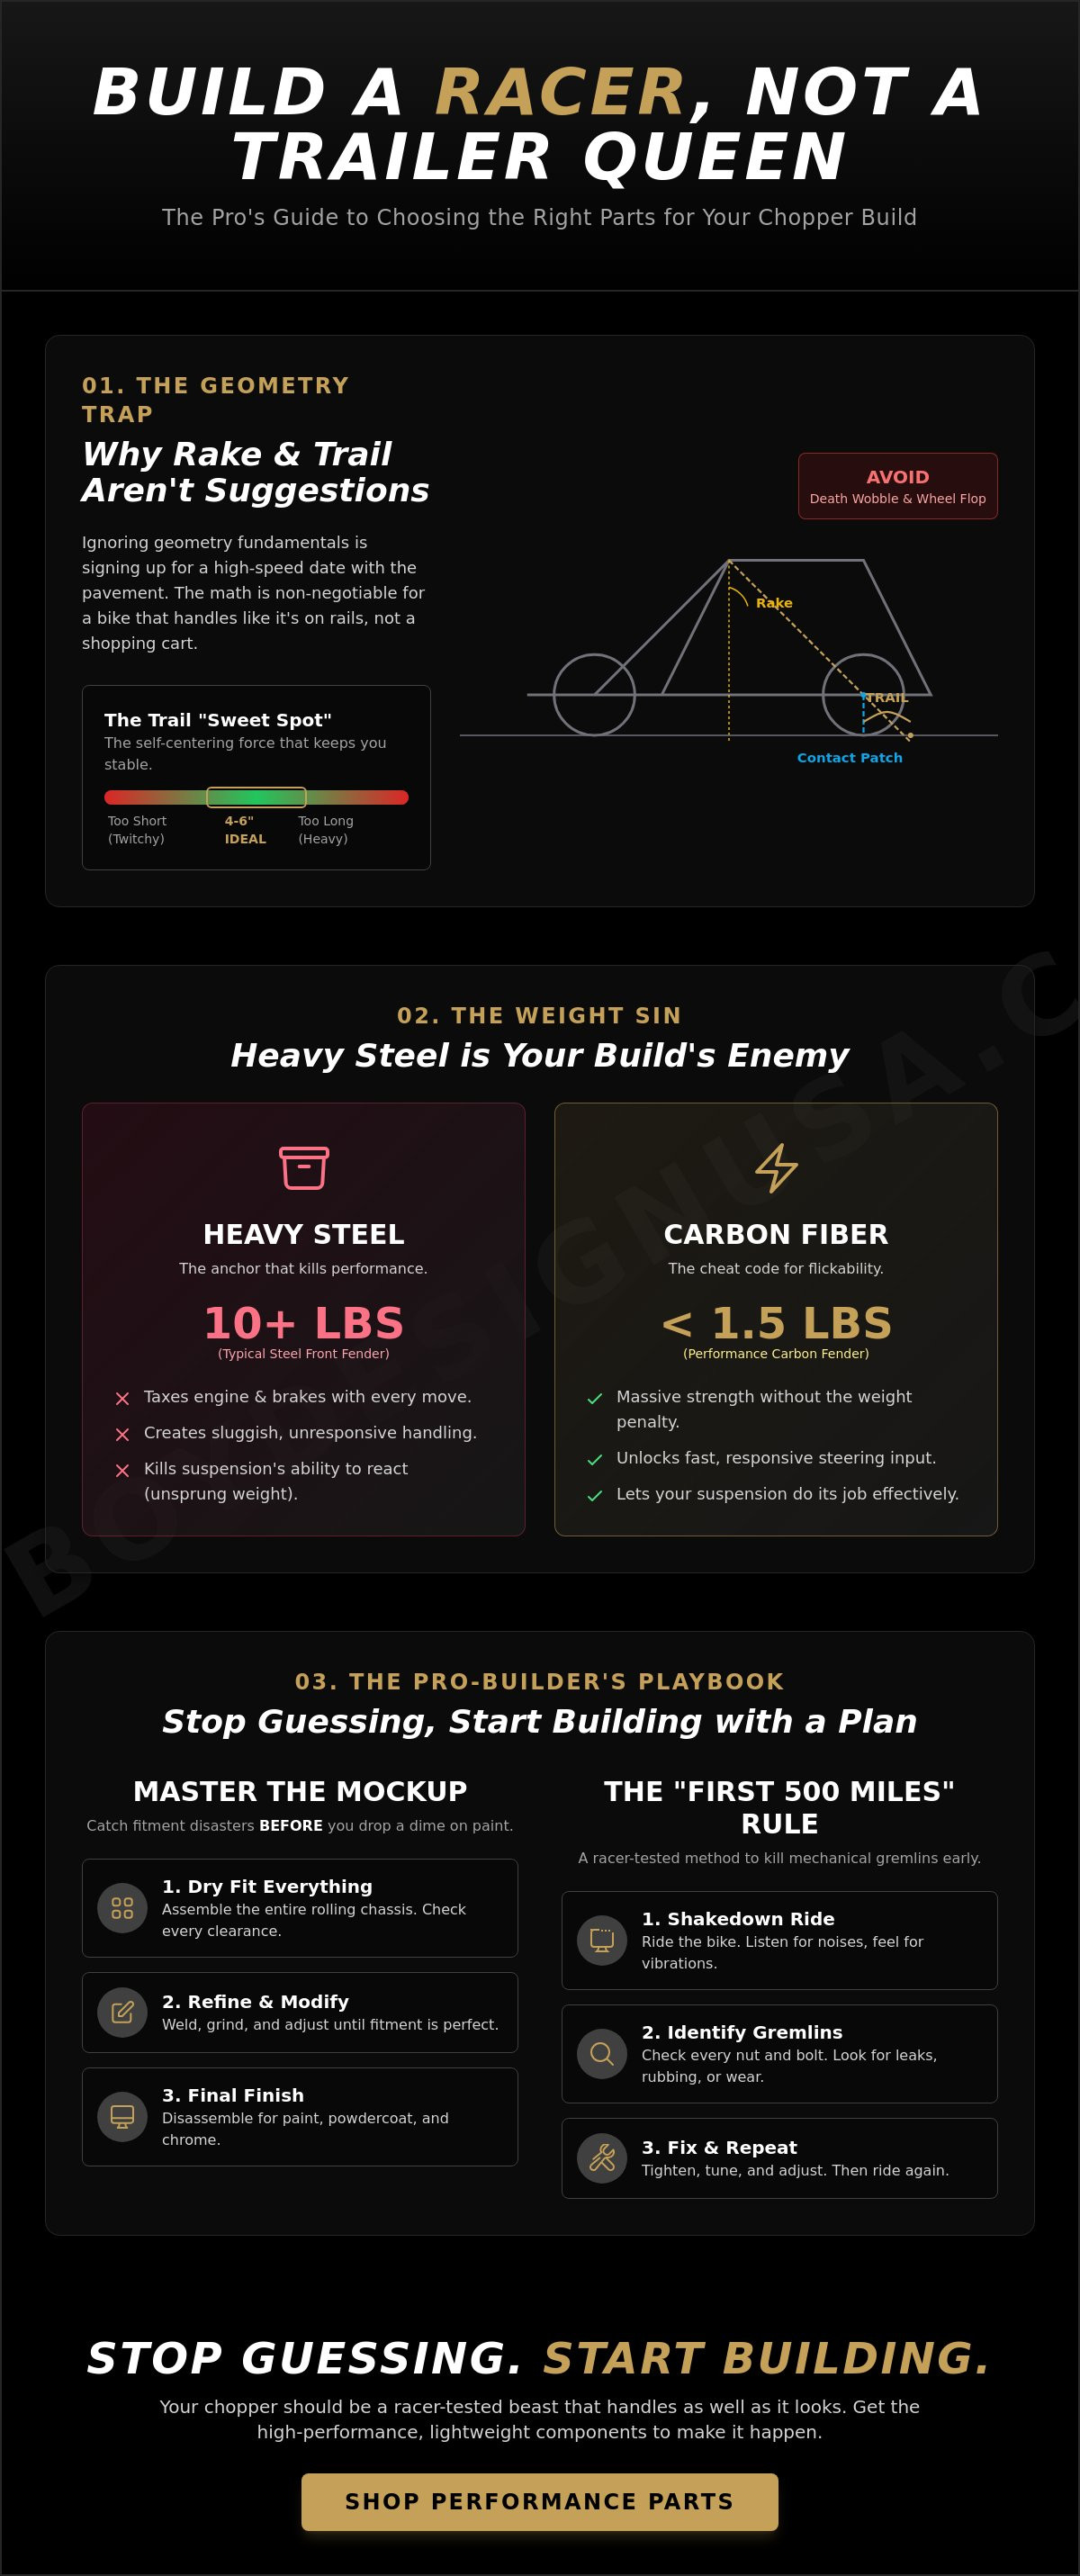
- Nail your geometry math to avoid the dreaded tank-slapper and build a bike that handles like it’s on rails.
- Slash the "weight tax" on your engine and brakes by choosing the right parts for a chopper build that prioritize performance over clunky steel.
- Master the mockup phase to catch fitment disasters before you drop a dime on expensive custom paint or powdercoat.
- Balance aggressive style with real-world leverage to ensure your handlebars provide road feedback instead of a grueling forearm workout.
- Follow the racer-tested "First 500 Miles" rule to identify and kill mechanical gremlins before they ruin your maiden voyage.
The Geometry Trap: Why Rake and Trail Aren’t Suggestions
Your chopper should be a racer-tested beast that handles as well as it looks. If you ignore motorcycle geometry fundamentals, you are basically signing up for a high-speed date with the pavement. Rake and trail are the DNA of your bike’s handling. Mess them up and you build a deathtrap. Looking cool at a stoplight is great, but it is not worth a violent tank-slapper at 70 mph. The math is non-negotiable. You must get your frame geometry right before you even think about laying that first weld. Your center of gravity depends on it. A neck that is set too high or a rake that is too shallow creates a bike that fights you at every turn.
The Death Wobble: Understanding Trail
Trail is the horizontal distance between the front tire's contact patch and the point where the steering axis hits the ground. It is the "self-centering" force that keeps your bike going straight. For most custom builds, four to six inches is the absolute sweet spot. If your trail is too short, the bike becomes twitchy and unstable. If it is too long, it feels like you are steering a freight train. Choosing the right parts for a chopper build means calculating this number before buying your forks. Even a simple change like swapping a 19-inch wheel for a 23-inch wheel mid-build can completely ruin your trail calculation. If you find yourself fighting a minor wobble, a performance steering damper kit can help, but it won't fix bad math.
Frame Planning vs. Winging It
Eyeballing is for seasoning a steak, not for setting a frame stretch or a neck rake. If you wing it, you end up with "wheel flop." Wheel flop is the annoying tendency of the front wheel to fall over or turn more sharply when you are trying to navigate a low-speed parking lot. It makes your bike feel heavy and clumsy. High rake angles also put massive stress on your front end. This leads to fork flex and terrible braking stability. You want a bike that feels planted. Plan your neck height and rake carefully to ensure the bike remains balanced. A well-planned frame ensures your chopper handles like a pro-racer machine instead of a garage nightmare. Stick to the blueprint and respect the physics of the ride.
Every decision you make in the design phase dictates how much you will actually enjoy the bike later. Don't let style override rideability. A bike that is a chore to ride will eventually just sit in the garage collecting dust. Build it to be ridden. Build it to be fast. Most importantly, build it to stay upright when the road gets demanding. Your future self will thank you when you’re carving corners instead of white-knuckling the bars.
The Weight Sin: Why Heavy Steel is Your Build’s Enemy
Every extra pound you bolt onto your frame is a tax. It’s a tax on your engine, a tax on your brakes, and a tax on your soul. Old-school purists love to scream that "steel is real," but in the high-stakes world of performance, heavy steel is just an anchor. Choosing the right parts for a chopper build is about shedding the fat so your machine can actually dance. Modern builders are ditching clunky, vibration-heavy metal for carbon fiber components that offer massive strength without the weight penalty. You want a bike that is flickable and responsive. You don't want a bike that feels like you're wrestling a water buffalo through every canyon carve.
Unsprung Weight and Handling
Unsprung weight is the secret killer of your suspension’s ability to react. This is the mass not supported by your springs. Think wheels, brakes, and fenders. If you slap a 10lb steel fender on your front end, your forks have to work twice as hard to keep that tire pinned to the asphalt. It’s sluggish. It’s unresponsive. It’s a total buzzkill. By switching to a Performance Bagger Racer Carbon Fiber Front Fender, you slash that front-end mass and let your suspension do its job. The difference in steering speed is night and day. While some people enjoy the custom motorcycle build process using whatever heavy scrap they find in a junk pile, serious performance requires better ingredients. Carbon fiber is the ultimate cheat code for front-end flickability.
Material Quality over Cheap Chrome
Follow the "Buy Once, Cry Once" rule. It’s tempting to grab cheap eBay chrome parts to save a few bucks for beer, but you’ll regret it by July. Cheap chrome pits, peels, and flakes after just one season of real-world riding. It looks like garbage. It ruins your aesthetic. High-quality Harley Davidson Carbon Fiber isn't just about the killer looks; it’s about survival. Carbon fiber has incredible vibration-dampening properties. It absorbs the high-frequency buzz that makes your hands go numb and your bolts rattle loose. It’s durable enough for everyday adventures and light enough to make your bike feel like a pro-racer machine.
Stop building a "trailer queen" that’s too heavy to actually ride. Focus on reducing mass where it counts. If you’re ready to stop taking life so seriously and start taking your performance personally, check out our bagger racing parts to see how much weight you can really lose. Your engine will thank you. Your brakes will thank you. Your forearms will definitely thank you.
The Mockup Myth: Skipping the Dry Run
You’ve spent months dreaming and finally ordered your components. The urge to slap everything together and hit the road is a siren song that leads straight to a garage nightmare. Stop. Mockup is the most boring phase of your build, but it is also the most critical. Paint is expensive. Drilling holes in fresh powdercoat is a tragedy that will make grown men weep. If a part doesn’t fit perfectly in raw steel, it definitely won’t fit after you’ve added layers of primer, base, and clear. Choosing the right parts for a chopper build is only half the battle; the other half is making sure they actually play nice together before the final finish.
The Systematic Mockup Checklist
Don't just throw parts at the frame and hope for the best. Follow a logical path to avoid backtracking. A systematic approach saves your sanity and your wallet. If you are working with a $5,995 custom chopper rolling chassis kit, you owe it to the machine to do this right.
- Step 1: Mount the engine and transmission. Check your primary alignment and the chain path. If your chain is going to saw through your frame, you need to know now.
- Step 2: Install your fenders and tanks. Check for tire clearance at full suspension compression. Ensure your Performance Bagger Racer Carbon Fiber Front Fender doesn't kiss the frame when you're at full lock.
- Step 3: Route all cables and wiring. Finalize every tab location before you strike an arc with the welder.
- Step 4: Sit on the bike. Finalize the ergonomics. If the reach to the bars feels like a medieval torture rack, change it now.
Wiring Nightmares and Fastener Failure
V-twins are essentially high-performance paint shakers. They vibrate. They buzz. They try to shake themselves into a pile of loose bolts. The racer’s mindset is simple: if a bolt can vibrate loose, it absolutely will. Never use cheap, hardware-store junk on a high-vibration machine. Grade 8 bolts are non-negotiable for every critical stress point. They are the only thing standing between you and a catastrophic failure at 80 mph.
Wiring is where most builds go to die. Internal wiring looks killer, but you must do it during the mockup. If you try to fish a harness through a finished, painted frame, you will regret it for the rest of your life. Plan your paths. Smooth your internal edges. Treat your electrical system with the same respect you give your engine. A bike that won't start because of a pinched wire is just a very heavy sculpture. Build it to run. Build it to last. Build it with the patience a custom machine deserves.
Cockpit Confusion: Risers, Bars, and Control
Your bars are the steering wheel of your soul. They are the primary feedback loop between your hands and the asphalt. Don't mute that connection with a setup that belongs on a wall hanger. If you choose bars based solely on what looks "hard" in a grainy social media post, you're going to have a miserable time. Choosing the right parts for a chopper build means finding the sweet spot between looking like a legend and actually being able to steer the damn bike. Stability at speed is the ultimate goal. You want to prevent the dreaded "death grip" that happens when your cockpit setup is fighting your natural posture.
Ergonomics vs. The Look
Let's settle the classic debate: Ape hangers versus T-bars. Ape hangers offer that iconic, sky-high silhouette, but they can feel like steering a sailboat in a hurricane if they're too tall. T-bars give you that aggressive, lane-splitting control and massive leverage. Leverage is king. Narrow bars on a long, raked-out chop are a physical workout you didn't ask for. Your arm position dictates your endurance for those 500-mile days. If your hands are above your heart, your blood flow is going to quit on you before the first fuel stop. Check out Handlebar Risers 101 to figure out the perfect height and pullback for your specific frame geometry.
Triple Tree Stability
While you're obsessing over the bars, don't forget the hardware holding them together. Your triple trees are the backbone of your front end. Low-quality, thin trees allow for "fork twist." This is that terrifying sensation when your wheel wants to go one way and your bars want to go another. It usually happens right when you need stability the most. Racers use beefier, CNC-machined trees to maintain absolute rigidity under hard braking and high-speed cornering. It’s about precision. If you want a front end that doesn't flex like a wet noodle, you need Bagger Racing Triple Trees. It’s the difference between a bike that feels like a toy and one that handles like a pro-racer machine.
Don't sacrifice control for a "cool" factor that leaves you exhausted after twenty minutes of riding. Build a bike that lets you dominate the road instead of just surviving it. If you're ready to upgrade your control center and stop settling for "good enough," grab some performance bagger parts and feel the difference in your very next turn. Your forearms will thank you later.
Racer-Tested: Bringing Pro-Performance to Your Garage
Your custom chopper is not just a motorcycle. It is a one-of-one prototype. It is a mechanical experiment that you are about to hurl down the highway at 70 mph. Treat it with the respect a prototype deserves. Choosing the right parts for a chopper build is the first step, but the testing phase is where you prove your engineering. Don’t be a test pilot for unproven, generic parts designed by people who have never felt a tank-slapper. If a component hasn't been pushed to the limit on a track, it has no business being on your bike. You want a machine that is as reliable as it is rebellious.
The Testing Phase
The maiden voyage is just the start of the process. You need to follow the "First 500 Miles" rule religiously. This isn't just about break-in; it's about survival. Start with heat cycles. Let that engine reach operating temperature and then let it cool completely. This allows gaskets to set and fasteners to settle into their final positions. After the first 50 miles, perform a comprehensive "nut and bolt" check. V-twins are legendary for their vibration. If a bolt can wiggle loose, it absolutely will.
- Heat Cycles: Check for weeping gaskets or fluid leaks after every thermal expansion.
- Fastener Settlement: Re-torque every critical bolt, especially on the motor mounts and triple trees.
- Stress Inspection: Use a bright light to look for hairline stress cracks in your tabs, mounts, and welds.
- Chain Tension: New chains and belts stretch significantly during the first few hours of operation.
Why Racer-Tested Parts Matter
There is a massive canyon between a part that "looks" like it works and one that has been hammered at 100 mph. At Fat Boy Design USA, we have over 13 years of racing experience baked into every single component we offer. We vet our performance bagger parts in the most demanding environments imaginable. We aren't interested in building "trailer queens" that only look good under fluorescent lights. We build for the asphalt. We build for the riders who want to stop taking life so seriously and start taking their cornering speed personally.
When you choose components from a brand with a racing heritage, you aren't just buying metal; you're buying peace of mind. You’re buying the certainty that your front end won't flex and your swingarm won't twist when the road gets aggressive. If you’re ready to graduate from generic catalog junk to hardware designed by racers, visit Fat Boy Design USA. Explore our lineup of carbon fiber and performance parts that are built to be ridden hard. Stop building sculptures. Build a racer-tested beast that actually handles like a pro machine. Your maiden voyage should be a celebration, not a rescue mission.
Ditch the Trailer and Claim the Asphalt
A chopper that doesn't handle is just a very expensive paperweight. You now have the roadmap to avoid the geometry traps and weight sins that turn custom dreams into garage nightmares. Remember that choosing the right parts for a chopper build is the ultimate difference between a bike that carves corners and one that just collects dust. Nail your mockup. Respect the math. Never settle for generic junk that hasn't seen a track. You deserve a ride that looks killer and handles like a pro-racer machine.
We've spent 13+ years in the professional racing world vetting every component we create. From our in-house manufacturing facility in Matthews, NC, we produce racer-tested carbon fiber components designed to survive the real world. Stop guessing and start winning. Build a beast that breathes fire with racer-tested parts from Fat Boy Design USA. It is time to stop building statues and start building legends. Get out there, twist the throttle, and make some noise.
Frequently Asked Questions
Is it cheaper to build a chopper or buy one already finished?
Buying a finished bike is almost always cheaper because you aren't paying for the previous owner's labor or "vision." Used motorcycle prices rose by 10% to 20% in 2025, but a custom build still eats cash faster than a track day. You build because you want a machine that reflects your soul, not because you’re looking for a bargain. It’s about the journey and the custom result.
What is the best donor engine for a first-time chopper build?
The Harley-Davidson Evolution or an S&S Evolution-style motor is the gold standard for beginners. These engines are bulletproof and have a massive aftermarket support system. An S&S 80-inch Evolution-style motor in black finish typically costs $7,803.07, providing a reliable heart for your project without the headache of vintage basket-case parts. They are easy to tune and even easier to find parts for.
How do I calculate the correct rake and trail for my specific frame?
You calculate trail by measuring the horizontal distance between where the steering axis hits the ground and the center of the tire's contact patch. Choosing the right parts for a chopper build requires keeping this number between four and six inches. Use a rake and trail calculator before you buy your forks to avoid building a bike that fights you at every turn.
Can I use modern carbon fiber parts on an old-school chopper build?
Absolutely. Mixing old-school lines with modern performance materials is a massive trend for 2026. Using carbon fiber components reduces unsprung weight and dampens the high-frequency vibrations that make your hands numb. It gives your build a "performance chopper" edge that stands out in a sea of heavy, chrome-covered anchors. It is the perfect way to modernize a classic silhouette.
What are the most common wiring mistakes on custom Harley builds?
Poor grounding and lack of internal wire protection are the top killers of custom electrical systems. V-twins are violent vibrators. If you don't smooth the internal holes in your frame or bars, the metal will saw through your insulation in 50 miles. Always use a dedicated ground wire instead of relying on the frame's powdercoated surface. Clean wiring is the mark of a pro.
Do I need a special license or inspection for a custom-built chopper?
Yes, your custom-built motorcycle will need a safety inspection and a state-issued VIN from your local DMV. Requirements vary by state, but you typically need receipts for the frame, engine, and transmission. In Texas, the annual registration fee for a motorcycle is $30.00 as of January 2026, plus any local county fees. Check your local regulations before you start your build.
How do I know if my chopper frame geometry is actually safe to ride?
A safe frame has a trail measurement of 4 to 6 inches and minimal wheel flop. If the handlebars feel like they want to "fall" over when you turn at low speeds, your neck height or rake is likely off. Choosing the right parts for a chopper build means verifying these numbers on a jig before you commit to final assembly. Safety isn't an accident; it's a calculation.
What is the death wobble and how do I prevent it on a long fork build?
The death wobble is a violent handlebar oscillation caused by improper geometry or loose components. Prevent it by ensuring your trail is sufficient and your front end is rigid. Using beefier triple trees and a steering damper can help, but they are no substitute for getting your rake and trail math right from the start. A stable bike is a fun bike.