
Harley Handlebars and Risers: Engineering the Ultimate Performance Cockpit
Why are you still wrestling with a "clunky" stock front end that handles like a shopping cart with a bad wheel? It's time to admit that your factory setup is killing your vibe and your spine. If you're tired of that vague steering feel at high speeds, upgrading your harley handlebars and risers is the only way to reclaim the road. We agree that a bike should look like an iconic showstopper and handle like a precision-engineered weapon. Stop settling for a ride that leaves you stiff and sore; it's time to join the club of riders who demand more from their machines.
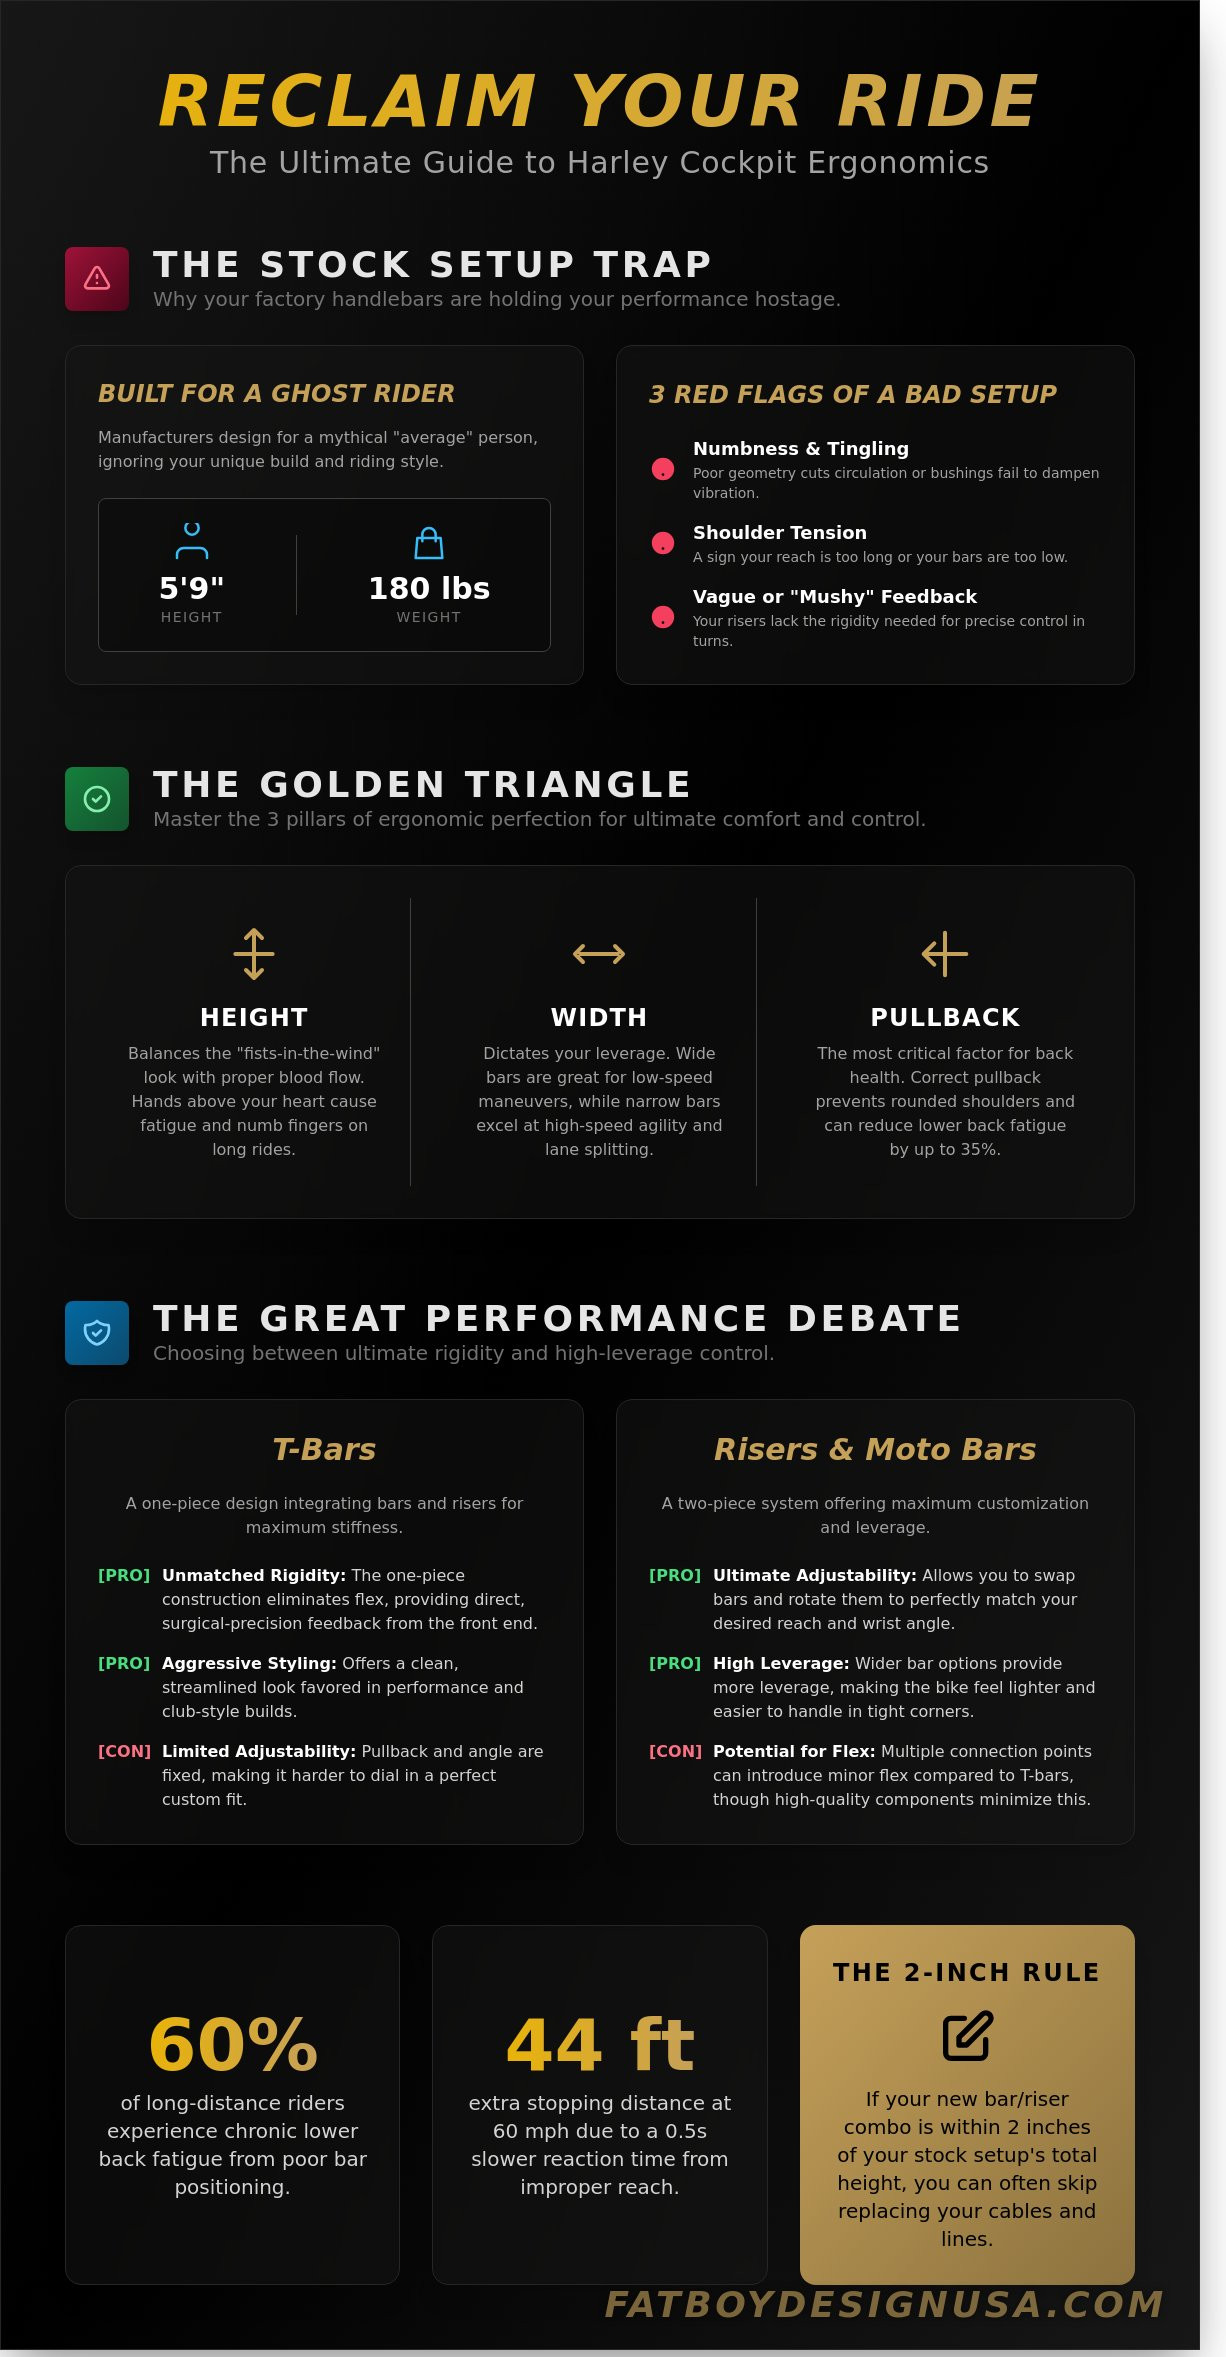
You're about to master the art of the perfect cockpit by blending bold style with racer-tested control. We'll show you how to achieve better leverage for aggressive cornering while finding the perfect arm height for those 500 mile days. A 2023 rider ergonomics report suggests that 60% of long-distance riders experience chronic lower back fatigue due to poor bar positioning. We're putting an end to that today. This guide breaks down how to choose the "ultimate" oversized components to ensure your bike feels as good as it looks. Get ready to transform your ride into a high-energy performance machine that rejects the mundane and embraces pure comfort.
Key Takeaways
- Stop settling for "average" and discover why your stock setup is a trap holding your performance hostage.
- Unlock the secrets of the "Golden Triangle" to balance that iconic fists-in-the-wind look with actual, functional comfort.
- Settle the great performance debate by choosing between the rigidity of T-bars or the high-leverage control of harley handlebars and risers.
- Master the "2-inch Rule" to save time and money on your install by knowing exactly when you can skip the cable replacement headache.
- Learn how to pair racer-tested carbon fiber with an optimized cockpit for a showstopper finish that dominates the road.
Why Your Stock Harley Handlebars and Risers are Holding You Back
The cockpit of your bike is the nerve center. It's the critical interface where your intent meets the machine's response. If that connection is fuzzy, your ride is trash. Most riders fall into the "Stock Trap" without even knowing it. Manufacturers design bikes for a mythical "average" human. This ghost rider is usually 5'9" and weighs exactly 180 pounds. If you don't fit that narrow window, your stock harley handlebars and risers are actively working against you. You aren't a statistic; you're a rider with a unique reach and a specific style.
Identifying a bad setup is easy if you know what to look for. Watch out for these three red flags:
- Numbness: If your fingers go tingly after 15 minutes, your geometry is cutting off circulation or your bushings are failing to damp high-frequency vibes.
- Shoulder Tension: That burning knot between your blades means your reach is too long or your bars are too low.
- Vague Feedback: If the front end feels like it's floating or "mushy" during a turn, your risers aren't providing the rigid connection you need.
At Fatboy Design, we don't do "good enough." Our philosophy is simple: if a part isn't racer-tested for extreme durability and long-haul comfort, it doesn't touch your bike. We build for the rider who wants to push limits, not just cruise to the grocery store.
The Anatomy of the Cockpit
Your control setup is a three-part harmony between the triple tree, the risers, and the bars. The triple tree is your foundation. Your risers bolt directly to it, acting as the pillars for your control. Choosing the right handlebar risers is the most important decision you'll make for your posture. Rigid-mount risers offer surgical precision for aggressive cornering, while rubber-mount options soak up the road buzz. The Motorcycle handlebar itself defines your width and pullback, completing the ergonomic triangle that dictates your entire "vibe" on the road.
The Performance Penalty of Bad Ergonomics
Bad ergonomics aren't just uncomfortable; they're a performance killer. An improper reach can slow your reaction time by as much as 0.5 seconds. At 60 mph, that's a massive 44 feet of extra travel before you even hit the brakes. High-rise setups without the proper structural support can also introduce instability. This often leads to the dreaded "death wobble" when you crest speeds of 80 mph. Looking cool is a priority, but it shouldn't mean you're miserable after 20 miles. Upgrading your harley handlebars and risers ensures you have the leverage to manhandle your bike through tight corners without sacrificing your spine in the process.
The Golden Triangle: Reach, Height, and Pullback
Stop fighting your bike and start riding it. The Golden Triangle is the holy trinity of ergonomic perfection, consisting of where your butt sits, where your feet rest, and where your hands grab. If your harley handlebars and risers aren't dialed in, you'll feel every bit of a 300 mile day in your neck and spine. It is about creating a cockpit that feels like a natural extension of your body rather than a gym workout you didn't sign up for.
Height is the first pillar. We all love the iconic "fists-in-the-wind" look of high bars, but there is a physical limit. If your hands sit above your heart for hours, gravity wins. Blood flow drops, your fingers start to tingle, and your grip strength vanishes. It's a vibe killer. Width is the second pillar. Wide bars give you chunky leverage for low-speed U-turns in a crowded parking lot. However, if you're the type to split lanes at 70 mph, a narrower profile is the ultimate game-changer for threading the needle without clipping mirrors.
Pullback is often the most overlooked factor in the triangle. It dictates the distance from the bars to your chest. If you're reaching too far forward, you're rounding your shoulders and straining your lumbar. This posture can lead to a 35 percent increase in lower back fatigue over a long weekend. When you're swapping parts, remember that the Federal Motor Vehicle Safety Standards provide the baseline for how these controls must function to keep you upright and in charge.
Measuring Your Personal Sweet Spot
Finding your fit doesn't require a degree in physics. Sit on your Harley, plant your feet, and close your eyes. Reach out to where you naturally want your hands to be. That is your target. Calculating your total rise is simple math: just add your riser height to the height of your mini-apes or T-bars. The ideal handlebar height aligns your wrists slightly below your shoulders to prevent nerve compression during long-haul touring. If you want to refine this further, check out our carbon fiber upgrades for a cockpit that looks as good as it feels.
The Impact of Pullback Risers
Choosing between straight and pullback risers changes your entire relationship with the front end. Straight risers are for the aggressive rider who wants to lean into the wind and stay on top of the bike. Pullback risers are for the loungers who want to chill out and enjoy a relaxed slouch. In the high-stakes world of Bagger racing, pullback affects how much leverage you have to manhandle the front wheel through a tight corner. For a deep dive into the technical side, read our motorcycle risers guide to see which setup matches your riding style. Get it right, and your harley handlebars and risers will turn your bike into a showstopper that's actually comfortable to ride.
T-Bars vs. Risers and Moto-Bars: The Great Performance Debate
The Performance Bagger movement is a total vibe. It transformed the Harley scene from chrome-drenched cruisers into 900lb apex-hunters. This shift changed everything about how we build a cockpit. You aren't just steering a bike; you're wrestling a heavyweight athlete through a technical course. Choosing the right harley handlebars and risers is the difference between a sloppy ride and a precision experience. High-performance setups prioritize leverage and stiffness over lazy aesthetics.
Racer-tested components are non-negotiable here. When you're pushing a massive touring frame through the twisties, the physics are brutal. Flex is the enemy. Every millimeter of movement in your bars translates to a loss of control at the front wheel. Pro-level builds demand chunky, oversized hardware that can handle the stress of aggressive cornering without flinching.
The T-Bar Revolution
Dyna and FXR riders started this fire decades ago. They needed a narrow, rigid setup to slice through heavy traffic and pop effortless wheelies. The one-piece T-bar became the iconic solution. Because the uprights are welded directly to the crossbar, there is zero movement. It feels like you're bolted directly to the fork tubes. This setup creates a tall, aggressive silhouette on a modern Road Glide or Street Glide, giving it that "club style" edge that looks fast even when parked. The only downside? You're locked into one position. If the pull-back isn't perfect, you can't just roll the bars to fix it.
Modular Mastery: Risers and 1-1/4" Bars
The pros often lean toward a separate riser and moto-bar setup for ultimate "micro-adjustments." This modular approach lets you pair a beefy 1-1/4 inch bar with a specific riser height to dial in your reach. It is a game-changer for long-distance comfort and high-speed control. You get the ability to tilt the bars forward or back until the ergonomics are 100% dialed for your arm length.
Managing the "mess" is the biggest hurdle with modular setups. Internal wiring for modern Harley controls is a tight fit, especially with 14 or 16 wires stuffed into a 1-1/4 inch tube. You need clean exits and smooth internal paths to keep it looking like a showstopper. Because high-leverage bars can amplify front-end feedback, running a steering damper kit is essential. It keeps the bike stable when you're pushing the limits. This setup delivers a chunky, industrial look that screams performance. It turns your harley handlebars and risers into a functional masterpiece that handles as good as it looks.
- T-Bars: Maximum rigidity, narrow profile, zero flex.
- Modular Setups: Infinite adjustability, oversized 1-1/4" strength, custom ergonomics.
- Performance: Both styles eliminate the rubbery feel of stock bushings and thin-walled bars.
Installation Secrets for a Showstopper Finish
Stop sweating the small stuff. The biggest fear in the garage is the dreaded cable swap. You think you’re just buying a set of harley handlebars and risers, but suddenly you’re worried about a $500 bill for brake lines. Relax. It’s not always a total overhaul. Most riders overthink the complexity because they don't know the industry secrets.
The "2-inch Rule" is your new best friend. Most modern Harley-Davidson models ship with approximately 2 inches of hidden slack tucked away. If your new setup stays within that 2-inch window, you can usually avoid the "full kit" nightmare. You just need to reroute, not replace. It’s about being smart with the slack you already own.
Bushings are the unsung heroes of your cockpit. Stock rubber bushings are designed for comfort, but they flex like a pool noodle once you add leverage. If you are installing anything over 8 inches of rise, those rubber mounts will feel mushy and unstable. Swap them for 100% polyurethane bushings immediately. This creates a rigid, high-performance connection that translates every movement directly to the pavement.
Safety isn't a suggestion; it's the law of the road. In the high-stakes world of bagger racing parts, "tight enough" is a dangerous myth. If your bars slip while you’re pinning the throttle, you’re headed for a bad time. Grab a torque wrench and follow the factory specs to the letter. It is the only way to ride with total confidence.
Cable Management and Extensions
Determine your needs before you tear the bike apart. If you’re jumping from stock bars to 14-inch apes, you need a full extension kit. If you’re just adding a 2-inch riser, you can likely pull the extra length from behind the neck. Routing wires internally is a test of patience, but it’s the only way to get that clean, iconic look. Always perform the "Full Lock" test before you button everything up. Turn the bars to the extreme left and right. If the throttle pulls or the wires bridge, you’re not done yet.
The Finishing Touches
Aesthetics matter as much as ergonomics. Matching your risers to your bike’s finish is a vibe check you can't afford to fail. High-gloss black looks mean on a darked-out build, while raw finishes scream performance. Your grips and mirrors should follow the leader. If you’ve raised the height, your mirrors might need a different angle to remain functional. Always use blue Loctite on riser bolts to ensure your iconic setup doesn’t vibrate loose at 80mph on the interstate.
Ready to build a cockpit that handles as good as it looks? Grab the best bagger racing parts in the game and start your transformation today.
The Fat Boy Design Edge: Racer-Tested Carbon and Chrome
Our North Carolina factory serves as the ultimate ground zero for high-octane innovation. We don't just ship boxes; we engineer adrenaline. While the market is flooded with generic mail-order junk that looks like it belongs on a budget shelf, FBD parts are born from track-tested grit. Your harley handlebars and risers are the literal handles on your machine's soul. Why pair them with anything less than racer-developed perfection? We've spent years rejecting the mundane to bring you components that look iconic and perform even better. When you choose FBD, you aren't just buying a part; you're joining a family of rebels who value speed and style in equal measure.
Carbon Fiber and Cockpit Control
Reducing unsprung weight is the secret sauce to a bike that actually listens to you. When you swap that heavy stock unit for a carbon fiber front fender, you're shedding pounds that directly affect your flick-ability. It makes your new harley handlebars and risers feel 25% more responsive during high-speed transitions. Our carbon fiber Harley parts follow a simple rule: if it doesn't make the bike faster or stronger, it doesn't make the cut. We are the "King of Carbon Fiber" because we've mastered the balance of lightweight perfection and chunky, durable strength. Every piece is built by racers who know exactly what it feels like to dive into a corner at 100 mph.
- Weight Reduction: Carbon fiber components weigh up to 60% less than their steel counterparts.
- Precision Engineering: Hand-laid weaves ensure maximum structural integrity under stress.
- Racer Input: Every design is vetted by riders who live for the podium.
Start Your Build Today
Stop dreaming and start wrenching on your masterpiece. The Upper Carbon Platinum Series is where you find the elite, showstopper finishes that turn every gas station stop into a photo op. We've logged thousands of miles to ensure these parts survive real-world abuse, from rain-soaked highways to scorching track days. Don't let your bike suffer from a lazy, sluggish setup. It's time to reclaim your cockpit and command the road with total confidence. If you need a roadmap for your next transformation, our latest Performance Bagger Guide provides the blueprint for building a beast that breathes fire. Grab your gear, choose your parts, and let's turn that Harley into a performance legend.
Grab the Bars and Claim Your Throne
Stop settling for a cockpit that feels like a rental. Your stock setup is holding you back from the aggressive, precise handling you deserve. We've broken down how the Golden Triangle of reach and height dictates your ride quality. You know the score now. Choosing between T-Bars and Moto-Bars isn't just about looks; it's about how you dominate the pavement. Upgrading your harley handlebars and risers is the ultimate game-changer for your bike's soul. It's the difference between fighting your machine and becoming one with it.
We've spent 13+ years in the professional racing circuit perfecting these designs. We don't outsource our soul. Every single component is manufactured in-house in Matthews, NC, to meet our brutal racer-tested performance standards. This is gear built for real life and high-speed adventures. It's time to ditch the mundane and embrace the iconic aesthetic of a showstopper finish. Don't let another mile go by on a bike that doesn't fit your vibe. Upgrade your cockpit with racer-tested gear at Fat Boy Design USA and start living the oversized life you were meant for. Your bike is waiting for its glow-up. Let's get to work.
Frequently Asked Questions
Do I need to change my cables if I install 10-inch risers on my Harley?
Yes, you definitely need to swap your cables for longer versions. Most stock Harley cables only provide 2 to 3 inches of wiggle room. Stepping up to 10-inch risers requires an extension kit for your brake lines, clutch cable, and throttle wires. Don't try to stretch them; you'll just end up with a snapped line and a very bad day.
What is the difference between straight and pullback risers?
Straight risers go vertical while pullback risers angle the bars toward your chest. Pullback risers usually offer 1.5 to 2 inches of rearward reach to save your lower back. Straight risers keep your weight forward for aggressive lane splitting. It's a choice between a relaxed lounge vibe and a total performance stance. Pick your poison.
Are T-bars better than traditional handlebars and risers for performance?
T-bars offer much better rigidity because they eliminate the traditional four-bolt clamp. This design reduces handlebar flex by roughly 15 percent during hard cornering. Your harley handlebars and risers setup becomes a rock-solid connection to the front wheel. It's the ultimate choice for riders who want to toss their bike around like a toy.
How do I stop my handlebars from vibrating at high speeds?
Ditch your factory rubber bushings for a set of solid or heavy-duty polyurethane versions. Polyurethane is 30 percent stiffer than the stock rubber found on 2024 models. This simple swap kills the "wet noodle" feeling in your hands instantly. You can also add weighted bar ends to drown out the buzz. Stop the shake and enjoy the ride.
Can I install my own Harley handlebars and risers at home?
You can absolutely handle this install if you have a socket set and 4 hours of spare time. About 65 percent of Harley owners choose the DIY route to save on shop labor. Internal wiring is the only tricky part; use some glass cleaner as a lubricant to slide those wires through. Just remember to torque every bolt to spec before you rip.
What is the best handlebar height for long-distance touring?
Aim for a height that keeps your hands slightly below your shoulders. This specific 90-degree arm angle prevents your fingers from going numb during a 500-mile haul. Most long-distance riders find that 10 to 12 inches of total rise is the sweet spot. It keeps your spine straight and your energy levels high while you crush miles.
Do I need to change my riser bushings when upgrading my bars?
Yes, you should always swap your bushings when installing new harley handlebars and risers. Factory rubber bushings typically wear out and get mushy after 10,000 miles of use. New polyurethane bushings provide a crisp, responsive feel that translates every input to the road. It's a small upgrade that makes your bike feel brand new again.
Will high risers make my Harley harder to handle in the wind?
Tall risers create a sail effect that increases wind resistance by 12 to 15 percent at highway speeds. You'll notice the bike catching more air when crosswinds hit 20 miles per hour or more. It isn't a dealbreaker, but it does require a bit more core strength to stay centered. Just stay relaxed and let the bike track through the gusts.