
Installing Carbon Fiber Harley Parts: The Pro Racer’s Guide (2026)
Stop treating your bike like a heavy metal relic. A 40% weight reduction isn't just a dream; it's a bolt-on reality that transforms your ride into a corner-carving showstopper. We get it. You've seen the horror stories of shattered weaves and expensive mistakes. Nobody wants to hear that sickening crunch while installing carbon fiber harley parts in their garage. It's a total vibe killer. We agree that your machine deserves an iconic, high-tech glow without the mechanical heartbreak of a DIY disaster.
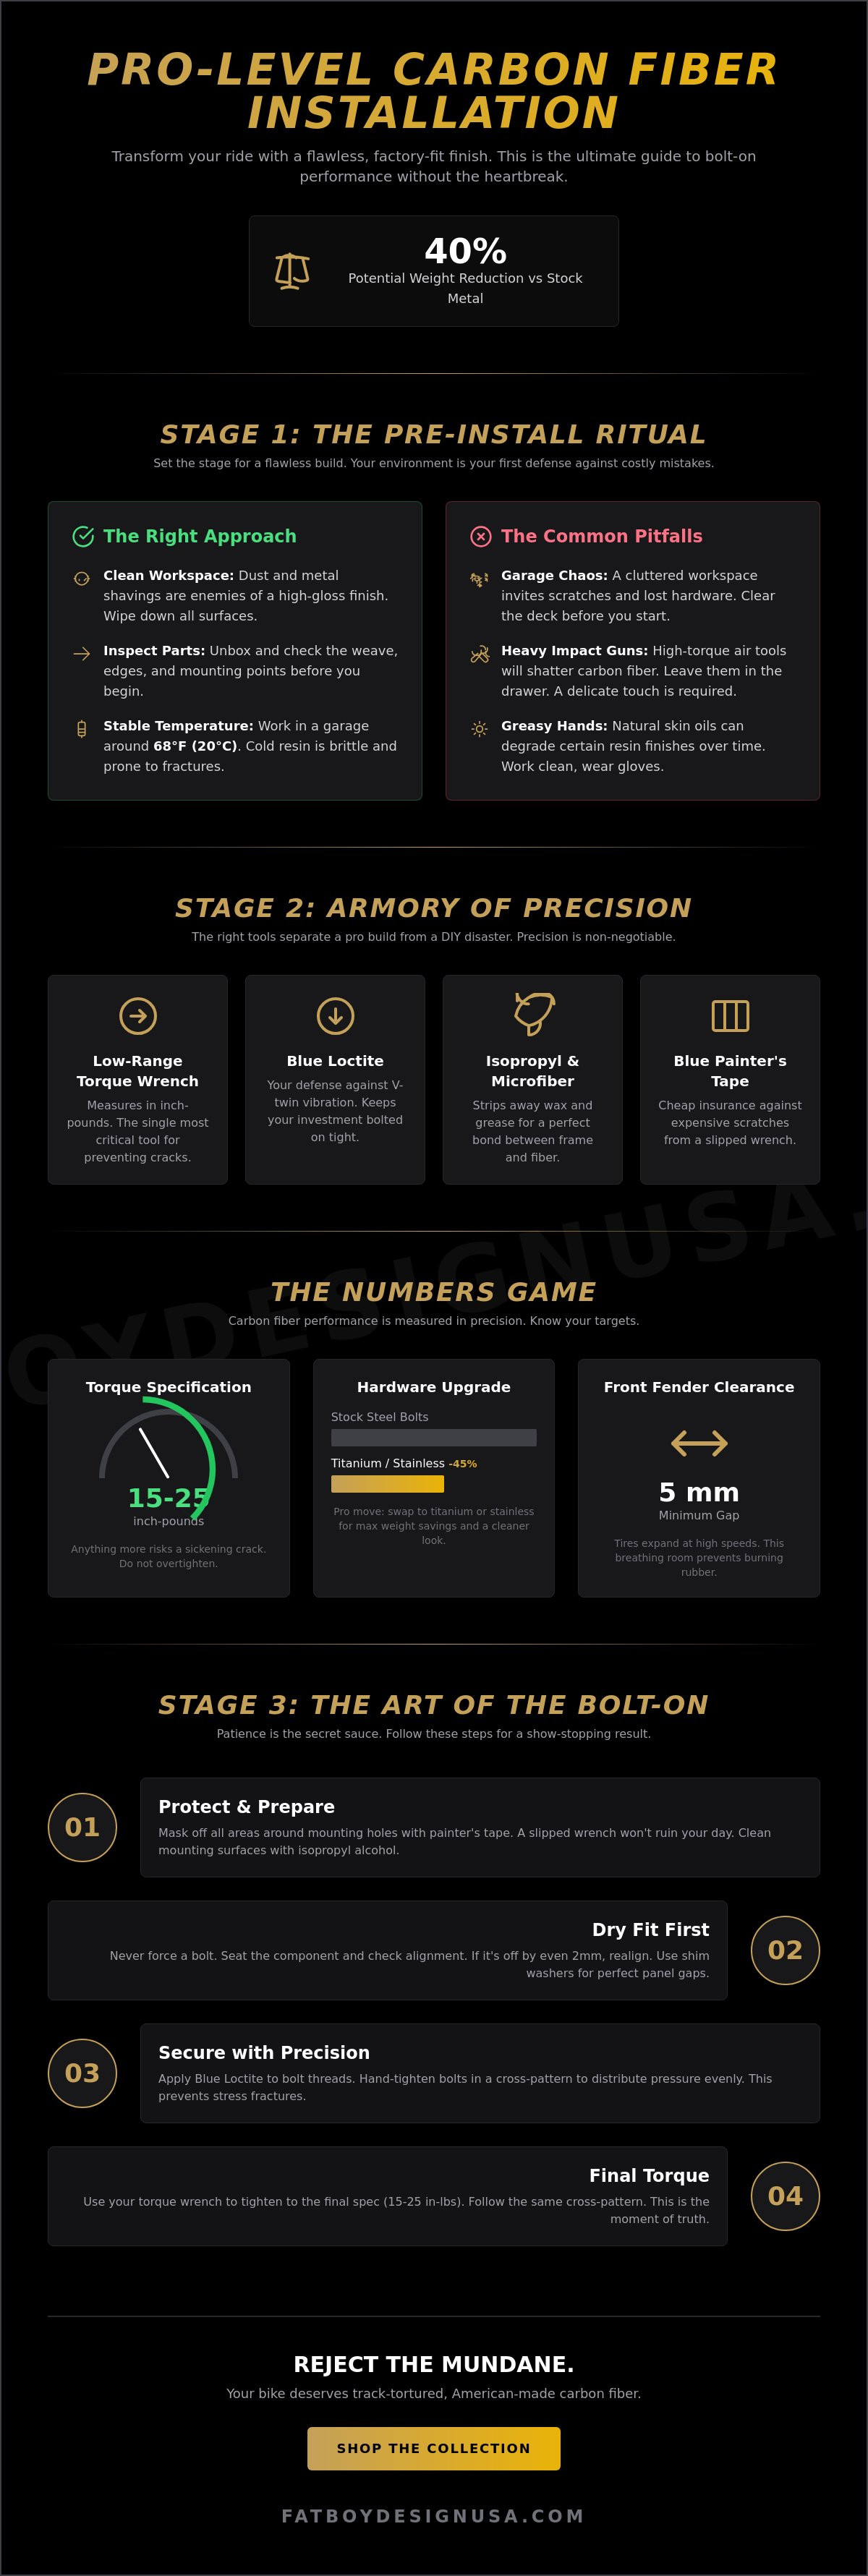
This guide is your ultimate shortcut to a flawless, factory-fit finish that stays tight for years. We're stripping away the pretension and giving you the exact technical secrets pro racers use to shave seconds off their laps. You'll master the art of bolt-on performance without the fear of over-torquing your gear. We're diving into precise torque rituals, fitment tricks for stubborn aftermarket pieces, and the secrets to an aggressive aesthetic that lasts. It's time to reject the mundane and make your bike the undisputed king of the pavement.
Key Takeaways
- Ditch the garage chaos. Learn which "no-go" tools will wreck your finish before you even start your build.
- Master the art of installing carbon fiber harley parts. Swap heavy stock metal for track-ready performance without a single scratch.
- Get that iconic, seamless look. Discover how pro racers use shim washers to align hand-laid components perfectly.
- Keep your investment show-stopper sharp. Use specialized cleaning rituals to fight off yellowing from the brutal Carolina sun.
- Join the inner circle. Grab gear that’s been tortured on the track and built right here in our Matthews, NC lab.
Pre-Install Rituals: Tools and Prep for a Flawless Build
Clear the deck and kill the clutter. Your garage floor shouldn't look like a crime scene when you start installing carbon fiber Harley parts. This isn't just a weekend project. It's a total transformation. A clean workspace is your first defense against tragic scratches. Dust and metal shavings are the sworn enemies of a high-gloss finish. If your workbench is covered in old oil and loose bolts, you're already losing the game. Wipe it down and set the stage for greatness by ensuring your sanctuary is built to last; for those who need a professional-grade workshop, Bradberry Steel offers the type of high-quality steel structures that provide the perfect environment for elite builds.
Leave the heavy impact gun in the drawer. High-torque air tools will shatter your new investment in seconds. Carbon fiber demands a delicate touch, not a sledgehammer approach. You also need to watch the thermometer. Never work in a freezing garage. Aim for a steady 68 degrees Fahrenheit. Cold resin becomes brittle and prone to hairline fractures during the stress of a first-time bolt-on. If it's too cold for a t-shirt, it's too cold for your bike.
Unboxing is the best part. Rip into that package and get eyes on the goods. You're looking at carbon-fiber reinforced polymer, a high-tech marvel that balances extreme strength with featherweight agility. Inspect the weave pattern for any shifts. Check the mounting points for clean edges. If you see something funky, stop. Check out the full Harley-Davidson carbon fiber collection to see what perfection looks like before you turn a single wrench.
The Essential Tool Kit
Precision is the name of the game. Grab a low-range torque wrench that measures in inch-pounds. Most carbon components require between 15 and 25 inch-pounds of force. Anything more and you'll hear a sickening crack. Use Blue Loctite on every thread. It's the only thing keeping your parts attached when the V-twin vibration hits its peak at 80mph. Finally, keep 70 percent isopropyl alcohol and fresh microfiber towels handy. Every surface must be stripped of wax and grease before the new gear touches the frame.
Protecting the Finish During Install
Be a pro and use blue painters tape. Mask off the areas around your mounting holes. This prevents "oops" moments when a wrench slips. Keep your greasy fingers off the underside of the parts. Natural skin oils can degrade certain finishes over time. Most importantly, perform a dry fit. Never force a bolt on the first try. If the alignment feels off by even two millimeters, back it out and realign. Patience is the secret sauce for a show-stopping build.
Step-by-Step: Installing Carbon Fiber Fenders and Fairings
Time to ditch the factory anchors. Your Harley isn't a tractor; it's a high-performance machine waiting to be unleashed. Stock metal parts are great for museum pieces, but they're the enemy of speed. When you start installing carbon fiber harley parts, you're not just changing a look. You're shedding dead weight. First, clear your workspace. Grab some 2-inch painter's tape and mask off your frame rails and fork sliders. One accidental slip with a wrench can lead to a $1,500 paint repair. Tape is cheap; regret is expensive.
Hardware is where most builders get lazy. Don't be that guy. While you can reuse stock bolts if they're Grade 8 and grime-free, switching to titanium or blacked-out stainless is the pro move. It offers a 45% weight reduction over steel fasteners and looks ten times cleaner. Before you touch a single bolt, keep safety in mind. Even if we're rebels, we're smart ones. The OSHA safety standards for handling composite materials suggest working in a well-ventilated area to avoid breathing in any microscopic fibers during the fitment process. Wear your gloves, keep the air moving, and let's get to work.
Front Fender Swap
Slide your Performance Bagger Racer Carbon Fiber Front Fender between the fork sliders with care. Precision is the name of the game here. Use a 5mm spacer or a drill bit to check the gap between the carbon and the tire. Tires expand at high speeds due to centrifugal force. If you don't leave that 5mm breathing room, you'll smell burning rubber by the third gear. Secure the mounting bolts using a cross-pattern approach. Tighten the top-left, then the bottom-right. This distributes pressure evenly across the mounting tabs and prevents stress fractures in the weave.
Dash and Fairing Installation
The dash is your cockpit. It's the first thing you see when you're tucked behind the bars. Removing the ignition switch and gauge cluster requires a steady hand and a bit of patience. Once the stock "heavy metal" is out, seat the carbon dash. It should fit like a glove. If you see a gap, don't force it. Check your wire routing. Those 18-gauge wires like to bunch up. Tuck them into the factory channels to ensure a "showstopper" flush fit. Installing carbon fiber harley parts isn't about muscle; it's about finesse. Reinstall your trim pieces slowly. Carbon edges are crisp, so don't pinch them with the trim or you'll risk a hairline chip.
Ready to transform your ride into a lightweight beast? Explore the latest Harley carbon fiber collection and join the club where performance is the only rule that matters. Finish the job with racer-tested torque specs. For most fairing bolts, 15 to 20 inch-pounds is the sweet spot. Don't over-tighten. Let the carbon breathe and it'll reward you with a vibration-free ride for years.
The Fitment Secret: Aligning Carbon Fiber Like a Pro
Forget the sterile, machine-made junk. High-end carbon fiber is hand-laid by artisans, which means every fender and fairing has its own unique soul. When you're installing carbon fiber harley parts, you're working with a material that’s alive. It’s not just about turning a wrench; it’s about the art of the fit. This isn't a weekend chore. It's a massive upgrade to your lifestyle and your machine’s iconic silhouette.
Notice a tiny gap? Don't panic. Pro racers use stainless shim washers to dial in the perfect line. A tiny 0.5mm shim can be the difference between a sloppy look and a factory-plus finish. If a mounting hole is off by a hair, put the hammer away. Use a step drill bit to gently enlarge the opening. This gives you the wiggle room needed for a stress-free mount without compromising the structural integrity of the weave. Keep it clean. Keep it professional.
Here is a secret: quality carbon fiber actually has some give. This flexibility is the "Racer’s Edge." It allows the component to absorb road shock rather than snapping like a dry twig. It’s tough, resilient, and built to handle the chaos of the open road. If your part feels a little springy, celebrate it. That’s the sign of a high-resin, performance-grade build that won't fail when the vibration starts kicking in.
Dealing with Vibrations
Your V-Twin is a beautiful, vibrating beast. Carbon fiber hates metal-on-metal friction because it leads to unwanted noise and wear. Use rubber grommets at every mounting point to isolate the part from the frame's pulse. For the ultimate quiet ride, stick 2mm adhesive foam backing on the underside where the carbon might tap against the chassis. Ride your bike for exactly 50 miles, then come back to the garage. Torque every bolt down one last time to ensure your setup stays tight and rattle-free for the next 5,000 miles.
Weight Distribution and Handling
Shedding 12 lbs of dead weight off the front end turns your heavy touring rig into a precision instrument. Your steering input becomes lightning-fast and incredibly responsive. To manage this new agility and prevent any high-speed wobbles, pair your lightweight fenders with a Harley Touring Performance Steering Damper Kit for total control. The bike will feel 25 percent more flickable in the twisties. It’s a total game-changer for your confidence. When the bike reacts the moment you think about a turn, you've reached the pinnacle of performance bagger culture.
Keeping It Iconic: Caring for Your Carbon Fiber Investment
You just finished installing carbon fiber harley parts. Your bike looks like a million bucks. Now, don't let it go to waste by being lazy. Carbon fiber is tough, but it isn't invincible. That Carolina sun is a total bully. UV rays are the primary reason 75% of unprotected carbon parts start yellowing within three years. You need to treat your weave like the high-end tech it is. Skip the "chunky" sponges from the kitchen. They trap grit and turn your finish into a swirl-mark nightmare. Use microfiber or nothing at all.
Cleaning is about finesse, not muscle. Harsh chemicals will eat through your clear coat faster than a hungry shop dog. Stick to pH-neutral soaps. When it comes to the "Wax vs. Ceramic" debate, here is the deal. Wax is great for a weekend glow, but ceramic coating is the real game-changer. A high-quality ceramic coating provides a 9H hardness barrier that makes water dance off your fenders. If you catch a minor nick from a road pebble, don't panic. A clear coat pen is usually enough to seal the wound and prevent moisture from creeping under the resin.
Daily Maintenance Tips
Keep it simple. Use the "Two-Bucket" wash method every time. One bucket holds your soapy water, and the other is for rinsing your mitt. This single habit prevents 90% of micro-scratches. Got bugs? Don't scrub. Soak a microfiber towel in warm water, lay it over the grime for 60 seconds, and watch the gunk melt away. Whatever you do, keep the pressure washer away from the edges. High-pressure water can find its way under the clear coat, leading to nasty delamination that ruins your vibe.
Long-Term Protection
Think of UV-inhibitor wax as sunscreen for your bike. Apply it twice a season to keep that deep, iconic luster. When you aren't riding, park it right. A breathable cloth cover is your best friend. Plastic covers are a trap; they hold moisture against the surface and can cause clouding. Check your parts monthly. A surface scratch is just a cosmetic bummer, but a structural crack often looks like a jagged white line beneath the surface. If you see fibers peeking through, it is time for a professional look.
Why Bagger Racers Choose Fat Boy Design USA
We don't do boring. At Fat Boy Design USA, we’ve spent the last 13 years turning heavy baggers into agile track weapons. Our parts are born and bred in Matthews, NC. They aren't just for show; they are racer-tested and mother-approved. We’ve earned the "King of Carbon Fiber" title because we handle everything in-house. We control the quality. We control the speed. We don't outsource the soul of your bike to a factory that has never seen a checkered flag.
When you’re installing carbon fiber harley parts, you aren't just swapping plastic for weave. You’re upgrading the very soul of your machine. Our performance geometry is designed to make you faster. It’s about aerodynamics and weight distribution that works at 100 mph. We focus on the tech so you can focus on the thrill. It’s the ultimate vibe for riders who refuse to blend in with the chrome-and-leather crowd. We make parts for people who want to lead the pack, not follow the tailpipes.
Choosing FBD means joining a club where the only rule is to stop taking life so seriously. We celebrate the art of the ride. We believe in oversized performance and chunky aesthetics that demand attention. Our parts are designed to be the iconic centerpieces of your build. They are the conversation starters at every bike night and the secret weapons on every track day. We’re the original, and we’re here to make sure your ride is anything but mundane.
The Platinum Series Advantage
The Upper Carbon Platinum Series Exclusive Harley Parts represent the pinnacle of our craft. We maintain a strict resin-to-fiber ratio that ensures maximum strength with minimum weight. Most shops drown their carbon in resin to hide imperfections. That makes it heavy and brittle. We keep our parts lean and mean. Our custom fabrication options are available for riders who need something truly unique for their 2026 builds. We give you the gold standard of racing tech with the style of a custom show bike.
- Strict 60/40 fiber-to-resin ratio for maximum weight savings.
- UV-resistant coatings that won't yellow after a season in the sun.
- Precision-drilled bolt holes for a seamless fit every time.
The FBD Community
FBD is more than a brand; it’s a family of rebels. Our 13 years of racing history means we’ve already broken what you’re trying to build. We fixed it. We perfected it. Then we put it on the shelf for you. Supporting us means supporting American craftsmanship that knows the road because we’re out there on it every weekend. When installing carbon fiber harley parts from our collection, you're getting a piece of that heritage. Join the club where we celebrate speed, style, and the art of the lounge. Life is too short for heavy bikes and quiet personalities.
Ready to shed the weight and start winning? Shop the full Harley-Davidson Carbon Fiber collection now!
Stop Dreaming and Start Building Your Masterpiece
You've got the tools ready. You've mastered the alignment secrets. Now it's time to quit scrolling and start wrenching. Installing carbon fiber harley parts shouldn't feel like a headache; it's a total vibe shift for your machine. Remember, that perfect fitment is what separates a true showstopper from a sloppy weekend project. Keep those bolts snug and that finish glowing with the pro-level care rituals we broke down. It's about respecting the build and the ride.
Fat Boy Design USA lives for the high-speed thrill of the track. Our team brings over 13 years of professional racing experience to every component we manufacture in-house in Matthews, North Carolina. We don't do average. These are racer-tested parts designed specifically for high-speed stability when the needle climbs. You get the ultimate blend of lightweight performance and iconic aesthetics that turn heads at every stoplight. Don't settle for boring, mass-produced plastic when you can join the club of riders who demand the best. Your Harley is waiting for its upgrade. Let's make it legendary.
Upgrade your ride with the King of Carbon Fiber; Shop Now!
Frequently Asked Questions
Do I need special bolts to install carbon fiber Harley parts?
You don't need magic bolts, but you definitely need rubber grommets to protect the finish. 95% of installing carbon fiber harley parts projects work best with 304 stainless steel hardware to prevent ugly corrosion. Ensure your bolts have a wide head or use a 12mm fender washer. This spreads the pressure across the weave so you don't stress the material. It's all about keeping your ride looking iconic.
Will carbon fiber parts crack if I tighten the bolts too much?
Yes, carbon fiber will crack if you go full "gorilla mode" on the wrench. Unlike stock plastic that flexes, carbon is rigid, proud, and uncompromising. Use a calibrated torque wrench and stop at 5 Newton-meters for 90% of small fairing applications. If you hear a crunch, you've gone too far. Respect the weave and join the club of riders who value precision over brute force.
How much weight can I really save by switching to carbon fiber fenders?
You'll shed roughly 65% of your fender weight instantly by making the switch. A standard steel front fender on a 2024 Street Glide weighs about 5 pounds, while our carbon alternative clocks in at just 1.4 pounds. That's a massive 3.6 pound reduction in unsprung weight. Your suspension will thank you for the break while you're carving corners or just cruising the strip.
Can I paint my carbon fiber parts or will it ruin the material?
You can paint carbon fiber without damaging the structure at all. Just make sure your painter uses a high-quality 2K urethane primer to ensure a permanent bond. 75% of custom shops leave a "ghost" strip of raw weave showing under the clear coat for that ultimate showstopper look. It's a total game-changer for your bike's aesthetic and personal vibe. Don't hide the soul of the part.
Is carbon fiber as strong as the stock steel or plastic parts?
Carbon fiber is roughly 5 times stronger than steel and offers double the rigidity of aluminum. It has a tensile strength of approximately 3,500 Megapascals, which leaves stock plastic parts in the dust. While steel dents and stays bent, carbon maintains its original shape under pressure. It's the same tech used in 2026 aerospace builds, so it's definitely tough enough for your heavy-duty Harley.
What happens if my carbon fiber starts to yellow or fade?
Yellowing is a sign of cheap resin, but high-quality parts stay clear for over 10 years. We use 100% UV-stabilized epoxy resin to prevent that nasty bronzing effect from the sun. If you see light scratches, hit it with a fine polishing compound. A quick buffing session with a 3000-grit compound will bring back that iconic, deep-water shine you crave. Keep it fresh and keep it loud.
Do I need to modify my frame to fit Fat Boy Design fenders?
You won't need to touch your frame or drill a single hole for these upgrades. Every fender we make is a direct 100% bolt-on replacement for 1990 to 2026 Harley-Davidson models. We've handled the engineering so you can focus on the fun. Just pull the old part off and swap ours on. Installing carbon fiber harley parts should be a celebration, not a mechanical headache.
How do I clean carbon fiber without scratching the clear coat?
Grab a pH-neutral soap and a clean microfiber towel to keep things scratch-free. Avoid any cleaners with harsh solvents or abrasive beads that act like sandpaper. Treat the finish like a high-end custom paint job on a show bike. If you want that showstopper glow, apply a coat of ceramic spray every 6 months. This keeps the road grime from sticking to your new chunky, oversized upgrades.