
Vintage Chopper Build Step by Step: The Ultimate Performance Blueprint
We agree that building your dream bike should be about pure enjoyment, not a headache over heavy, outdated parts. We promise to strip away the pretension and give you a clear roadmap from a bare frame to the first kick. You'll learn how to swap chunky steel for elite carbon fiber components while keeping that classic silhouette. This blueprint covers everything from selecting a 1976 Shovelhead motor to installing performance swingarms that turn a vintage vibe into a high-speed reality. It's time to reject the mundane and build a lightweight showstopper that actually performs. If you want to apply these same modernization principles to four-wheeled projects, Restomod Academy offers an expert roadmap for modernizing your classic car.
Key Takeaways
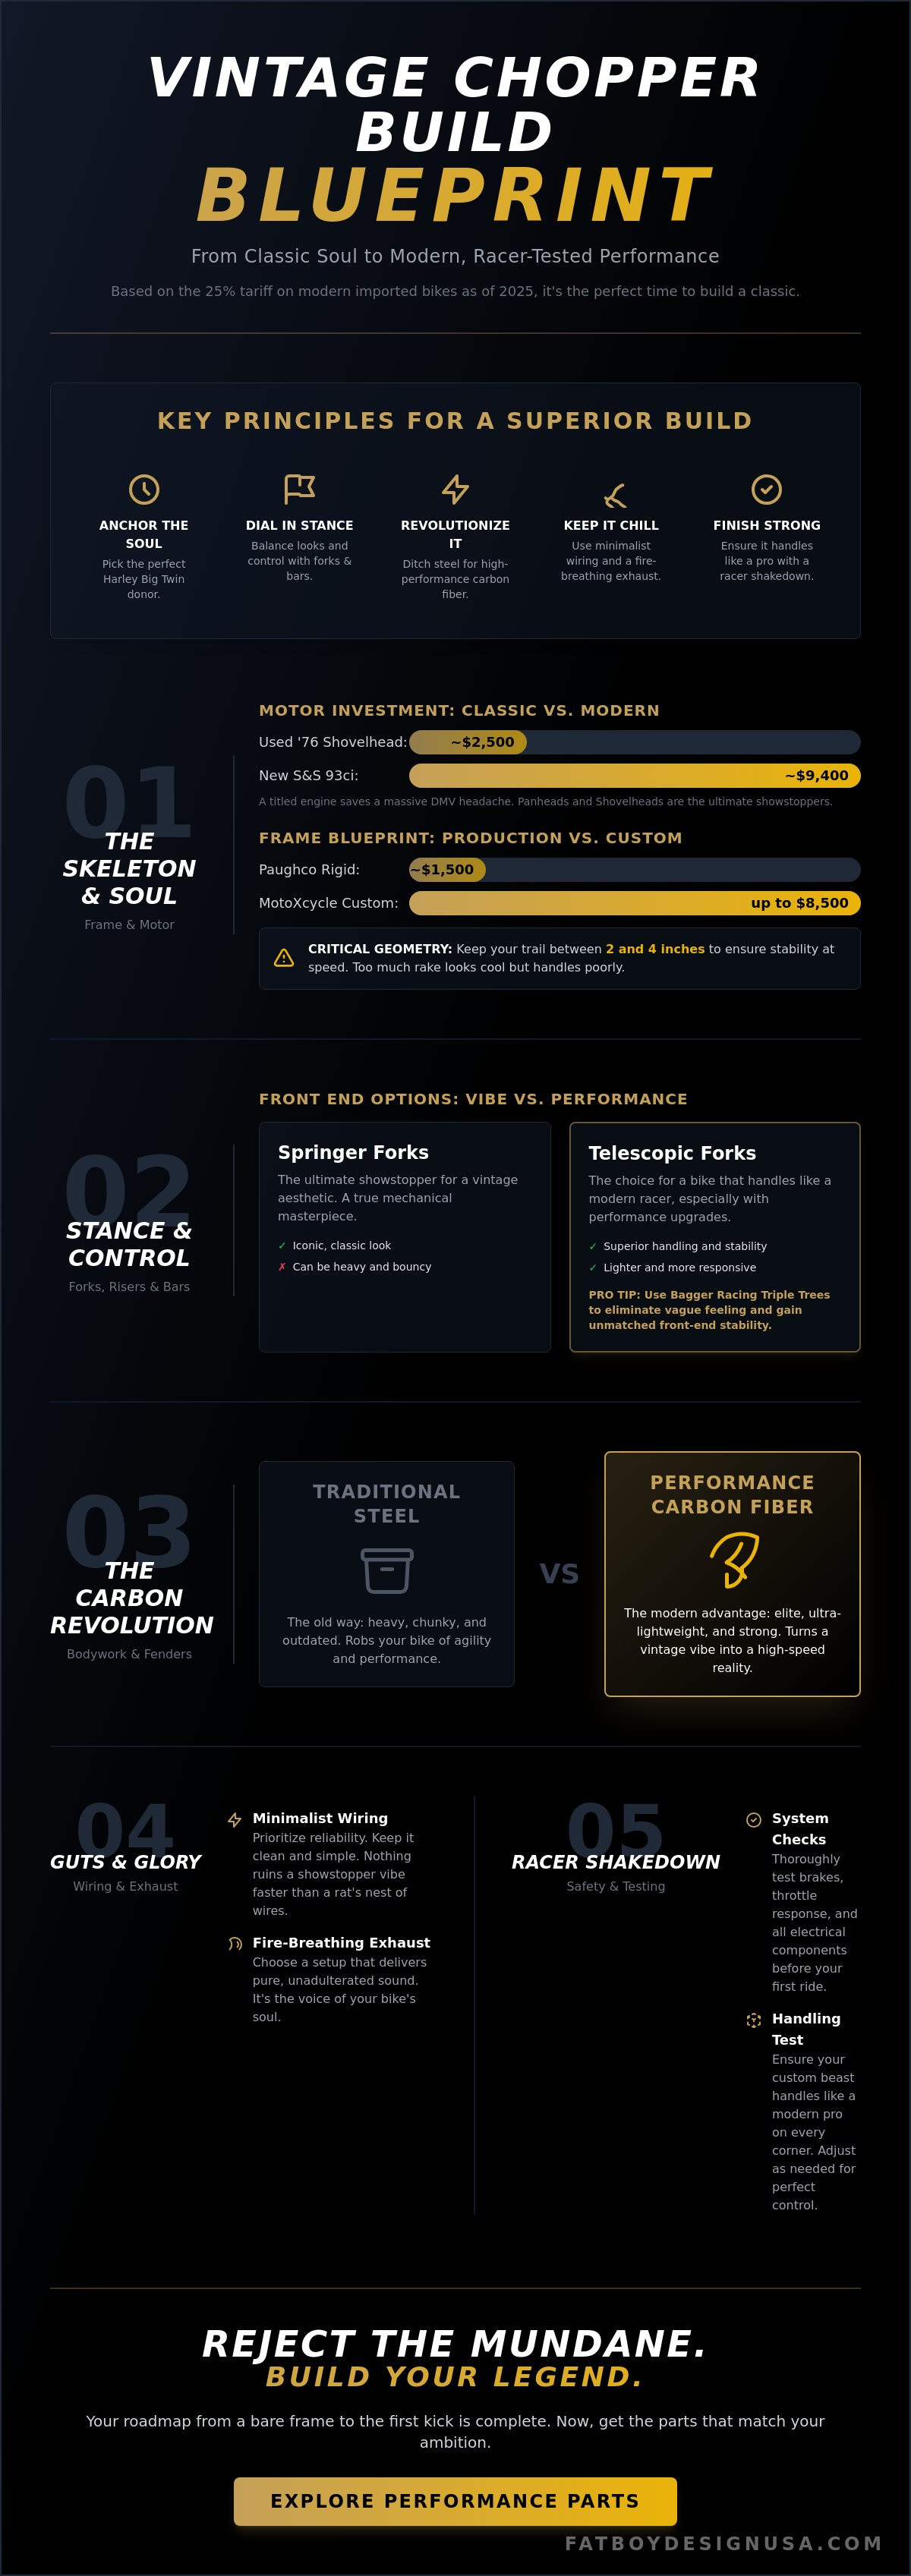
- Pick the perfect Harley Big Twin donor to anchor your build's soul and dictate that iconic silhouette.
- Dial in your stance by choosing the right fork length and bars that balance showstopper looks with actual control.
- Revolutionize your vintage chopper build step by step by ditching chunky steel for high-performance carbon fiber bodywork.
- Keep it chill with minimalist wiring and fire-breathing exhaust setups that prioritize reliability and pure, unadulterated sound.
- Finish strong with a racer-tested shakedown to ensure your custom beast handles like a modern pro on every corner.
Phase 1: The Skeleton and the Soul (Frame & Motor)
Your chopper's soul isn't found in a catalog. It's forged where the frame meets the motor. This combo dictates your entire vibe. If you want a bike that looks like it belongs in the history of the chopper, you start with a Harley-Davidson Big Twin from the 1950s through the 1980s. These are the gold standard. They're chunky, loud, and unapologetically cool. When starting your vintage chopper build step by step, grab a motor with a title. A used 1976 Shovelhead engine might run you $2,500 on eBay, but that piece of paper saves you a massive headache at the DMV. If you've got the cash and want zero drama, S&S Cycle offers a new 93 cubic inch Shovelhead-style motor for approximately $9,400. It's the ultimate way to get classic looks with modern reliability.
The Frame Blueprint
Don't overcomplicate the bones. You can buy a mass-produced rigid frame from Paughco starting around $1,500, or drop up to $8,500 on a high-end custom chassis from MotoXcycle. If you want that iconic look, go hardtail. Your spine might hate you, but your ego will thank you. If you want a bit of chill for your spine, stick with a swingarm frame. For those building a performance-first machine, check out bagger racing parts like a heavy-duty swingarm to keep the rear end planted. Just watch your rake and trail. Too much rake looks killer but handles like a shopping cart in a gravel pit. Keep the trail between 2 and 4 inches to ensure you don't end up in a ditch at 70 mph. The King of Frames is always a vintage Harley-style chassis with clean welds and a straight backbone.
The Motor and Transmission Marriage
The Panhead and Shovelhead are the ultimate showstoppers. They vibrate, they leak a little, and they sound like God's own drum kit. Pair that motor with a solid transmission. A 4-speed is classic for that stripped-down vibe, but a 5-speed makes highway cruising a total chill-out session. Thinking about a jockey shift? It's the ultimate cool kid move. It replaces the handlebar clutch with a foot pedal and the foot shifter with a hand lever. It's a game-changer for style, but it's a steep learning curve for first-time builders. Maybe skip it if you want to focus on riding rather than stalling at every green light. A titled engine and a smooth-shifting box are the two ingredients that turn a pile of parts into a real motorcycle.
Phase 2: Stance and Control (Forks, Risers, and Bars)
Stance is the vibe check of your motorcycle. It's the difference between a bike that looks like a lean, mean racer and one that looks like a confused lawn ornament. When you're executing a vintage chopper build step by step, the front end is where you decide your fate. Fork length is the primary lever here. A set of +6 over tubes gives you that classic, stretched silhouette, while stock length keeps things snappy for the corners. Don't just guess. The way your bike sits on the pavement tells the world exactly what kind of rider you are.
While you're hacking away at the front end, keep in mind that NHTSA regulations on motorcycle frames confirm there are no federal standards for custom frames, giving you plenty of creative freedom. But don't let that freedom lead to a speed wobble. You need to calculate your trail. Aim for 2 to 4 inches of trail. If it's too short, your bike will be twitchy. If it's too long, it'll handle like a cruise ship. It's a game-changer for your safety and your confidence on the road.
Choosing Your Front End
Springers are the ultimate showstopper for a vintage aesthetic. They look like a mechanical masterpiece. However, they can be heavy and a bit bouncy. If you want a bike that handles like a modern racer, go with telescopic forks. To get the best of both worlds, we recommend using Bagger Racing Triple Trees. These provide a level of front-end stability that standard trees just can't touch. They eliminate that vague, disconnected feeling when you're pushing through a sharp turn. You want to know that when you point the wheel, the bike follows without a fight.
The Art of the Pullback
Your bars and risers are the control center of the beast. This is where high-quality handlebar risers come into play. They're the most overlooked part of most builds. A good set of risers defines your posture. Ape hangers offer that iconic wind-in-your-face look, but T-Bars give you the ultimate leverage for aggressive riding. Mix and match your bars and risers for a custom finish that fits your body. Keep your cable management clean. Nothing ruins a showstopper vibe faster than a rat's nest of wires. If you want to really elevate your control, consider adding a performance steering damper kit to keep things steady when the road gets rough. It's the smart way to build a bike that looks vintage but rides like it's from the future.
Phase 3: The Carbon Revolution (Bodywork and Fenders)
Forget the old-school purists who insist that every ounce of your bike needs to be heavy-duty steel. Steel is heavy. Heavy is slow. Slow is boring. If you want a machine that actually dances through the twisties, it’s time to embrace the Carbon Revolution. Modern custom motorcycle culture is shifting away from the lead sled mentality. Shedding pounds from the front end is the ultimate way to improve flickability. When you’re following a vintage chopper build step by step, don't just follow dusty 1970s blueprints. Use aerospace-grade materials to make that vintage soul fly.
Nobody likes a rattling fender at 80 mph. It’s annoying. It’s dangerous. Use rubber-isolated mounts and Loctite 242 to ensure a rock-solid fit. It keeps things tight while you’re tearing up the pavement. A custom dash kit from the Platinum Series cleans up your tank area. It replaces chunky plastic with a sleek, performance-inspired look that screams quality. This isn't just about looks; it's about stripping away the mundane and focusing on pure, lightweight enjoyment.
The Performance Front Fender
A Carbon Fiber Front Fender is a total game-changer for handling. Standard steel fenders can weigh between 5 and 8 pounds. A carbon fiber version often weighs less than 2 pounds. That is a massive reduction in unsprung weight. Unlike fiberglass, which can crack under heavy stress, or steel, which vibrates like a jackhammer, carbon fiber damps vibration and stays rigid. It is the ultimate way to get that low-profile look without sacrificing structural integrity. You get the iconic silhouette with modern, racer-tested durability.
Tanks and Side Covers
Your backbone deserves better than a leaky, oversized tank. Pick a gas tank that hugs the frame perfectly to maintain that slim profile. Then, use Carbon Fiber Side Covers to hide that ugly rat's nest of wiring. It keeps the bike looking clean and light. The showstopper finish of a carbon weave adds a modern, high-tech texture to a vintage paint job. It is the perfect blend of old-school soul and new-school performance. This is the secret sauce to making your vintage chopper build step by step stand out in a sea of chrome and rust. Stop taking life so seriously and start building something that actually performs.
Phase 4: Guts and Glory (Wiring and Exhaust)
Wiring is usually the part of a vintage chopper build step by step where people start crying. They imagine a rat's nest of tangled copper and blown fuses. Stop that. If you aren't trying to power a space station, wiring is actually a total chill-out session. Minimalist "chopper wiring" isn't just for lazy builders; it's a reliability game-changer. By stripping away the junk, you eliminate 90% of the things that can go wrong on the side of a highway. You want a bike that starts, runs, and screams, not one that requires a degree in electrical engineering just to turn on the headlight.
While you're cleaning up the guts, don't forget the fuel and fire. Carburetion is the king of the vintage vibe. While modern bikes mess around with EFI and sensors, a classic S&S Super E carburetor remains the ultimate showstopper for a Shovelhead or Panhead. It's simple, it's iconic, and it gives you that perfect "potato-potato" Harley idle that turns heads at every stoplight. Keep the "see-through" frame look by hiding your battery in a custom box under the transmission or tucked away behind some sleek bodywork. For those who want to see this same passion for vintage machinery applied to four-wheeled classics, be sure to visit Elite Restomods.
Minimalist Wiring 101
Stick to the "Three Wire" setup. You only need circuits for ignition, charging, and lights. That is it. Use an electronic ignition to ensure a one-kick start every single time. Points are cool for history buffs, but they're a headache for real-life adventures. Use high-quality, heat-shrink connectors to prevent roadside failures caused by engine vibration. If you want to hide the remaining mess, grab some Carbon Fiber Side Covers to keep everything tucked away and lightweight. It's the smartest way to keep your build looking clean without adding chunky steel weight.
Exhaust and Fuel
Your exhaust defines your bike's voice. Drag pipes offer pure, unadulterated noise, but a 2-into-1 system actually improves your mid-range torque. Choose pipes that look iconic and breathe fire. Just remember that states like California have an 80-decibel limit for motorcycles built after 1985, so don't get too carried away if you hate paying fines. Use performance-grade gaskets to manage the heat and prevent leaks. Once the pipes are on, fine-tune your carb. A properly jetted S&S carb makes your vintage chopper build step by step feel like a modern racer. It's all about that sustained ease of comfort once the hard work is done. Ready to finish the look? Upgrade your tank area with a carbon fiber dash to match your performance-first guts.
Phase 5: The Racer-Tested Shakedown (Safety and Testing)
Most builders think that once the engine fires up, the job is over. That is a lie. That is how you end up on the side of the road with a missing fender and a bruised ego. At Fat Boy Design USA, we reject the "good enough" attitude found in lazy forum advice. Every component we create is racer-tested. We put our gear through the wringer in the dirt and on the track before it ever hits your doorstep. Finishing your vintage chopper build step by step requires a brutal honesty about your own work. If a part is loose, it is a liability. If it is sketchy, it is a death trap. Don’t take life so seriously, but take your torque specs very seriously.
Before you hit the highway, perform a 50-mile shakedown. Stay close to home. Listen for new rattles. Feel for weird vibrations. A vintage Harley motor is basically a giant paint shaker on wheels. It wants to spit out every bolt you’ve installed. This is where Loc-Tite becomes your best friend. Use Blue 242 on your accessories and Red 271 on the structural stuff you never want to see move again. Check your work every 10 miles during that first ride. It is the difference between a showstopper and a roadside tragedy. This phase is what separates the real riders from the garage ornaments.
The Critical Safety Checklist
Safety isn't boring; it is what keeps the party going. First, check your brake line clearance. Compress your forks fully and turn the bars lock-to-lock. If anything pinches or rubs, fix it now. For bikes with a heavy rake or long tubes, a Performance Steering Damper is a literal life-saver. It kills the high-speed wobbles that haunt custom front ends. Finally, verify your chain alignment. A chain that isn't straight will chew through your sprockets in less than 500 miles. Tension it under load by having a buddy sit on the bike to simulate real-world riding conditions.
Final Aesthetics and Rideability
Now for the fun part. Adjust your bars and pegs until you find that ultimate chill riding position. You want to look like a rebel, not a pretzel. Once the ergonomics are dialed, give the bike a final polish. Make that Harley Carbon Fiber pop against the chrome. The contrast between high-tech weave and vintage metal is a total game-changer for your bike's vibe. Welcome to the club. Completing your vintage chopper build step by step isn't the end of the road. It is just the beginning of the adventure. Now get out there and enjoy the ride.
Time to Kickstart Your Legend
At Fat Boy Design USA, we don't hide behind corporate jargon. We speak the language of speed and comfort. With over 13 years of professional racing experience, we manufacture our parts in-house in Matthews, NC, to ensure they survive real-life adventures. Our carbon fiber isn't just for show; it's tested to high-performance racing standards so you can ride without a worry. Join the club of builders who value quality as much as a good time. Now, get out there and let that engine scream.
Upgrade your build with racer-tested Carbon Fiber parts!
Frequently Asked Questions
How much does it cost to build a vintage chopper from scratch?
Building a custom beast varies wildly based on your taste for showstopper parts. A used 1976 Shovelhead motor runs around $2,500 on eBay, while a new S&S version hits approximately $9,400. Combine that with a $1,500 Paughco frame and your total budget likely lands between $12,000 and $25,000. It is an investment in your sanity and your street cred.
Do I need special tools to build a custom motorcycle at home?
Most custom builds can be completed with a standard set of hand tools, a torque wrench, and a reliable bike lift. For those looking to scale their restoration skills to more complex four-wheeled projects, check out Restomod Academy for professional guidance on the tools and techniques used in classic car restomodding.
What is the best donor bike for a first-time chopper build?
Harley-Davidson Big Twins from the 1950s to the 1980s are the ultimate choice for any builder. They offer the most iconic silhouette and the easiest parts availability in the aftermarket world. If you want to skip the hunt, Harley is releasing a modern "Shovelhead" branded bike in 2026 starting at $28,999, but building your own from a vintage donor is way more rewarding.
Is carbon fiber actually strong enough for a custom Harley build?
Carbon fiber is actually stronger and more durable than the heavy steel junk your grandpa used. It is aerospace-grade tech that handles vibration much better than cheap fiberglass. Our front fenders weigh less than 2 pounds compared to chunky 8-pound steel versions. It is a total game-changer for your bike's flickability and overall performance.
How do I make my vintage chopper handle better at high speeds?
High-speed stability comes down to your front-end geometry and component quality. Adding a performance steering damper and using Bagger Racing Triple Trees will kill the dreaded speed wobbles. Ensuring your vintage chopper build step by step has a trail measurement between 2 and 4 inches keeps the bike planted when you're tearing up the highway.
Can I build a chopper without a welding machine?
You can definitely build a world-class chopper without ever touching a welder. Buy a pre-fabricated frame from a reputable source like Paughco for around $1,500 to save yourself the fabrication headache. This allows you to focus on the assembly and "Guts and Glory" phases rather than learning how to fuse metal in your backyard. It's the fastest way to get on the road.
What are the legal requirements for a custom bike build in the USA?
Federal regulations allow a once-in-a-lifetime EPA exemption for personal builds, but you can't sell the bike for five years. Check your local noise laws; California limits motorcycles built after 1985 to 80 decibels. Also, watch your handlebar height. Many states restrict bars to no more than 15 inches above the seat to keep your ride legal and controllable.
How long does a step-by-step chopper build typically take?
A vintage chopper build step by step usually takes between 6 months and 2 years to complete. It depends on your parts budget and how much time you spend "chilling" versus actually wrenching in the garage. Don't rush the process. Part of the fun is the journey from a bare frame to that glorious first kick-start.